After installation, supervision is already running. A newly added account gets 120 minutes a day, can use the computer at any hour and is signed out when time runs out. Now set your own rules for each child.
Ask the children to save their work and sign out while you configure the program. Changing the rules can end a session in progress if the time already used exceeds the new limit or the current time falls outside the allowed hours.
The screenshots currently show the Polish interface. The instructions use the English labels.
Open the panel and choose a computer
From the parent’s account, open FamilyTimeGuard Parent Panel from the Start menu and approve the Windows request for administrator permissions.
If the panel opens in Polish, choose Język… → English, confirm the change, then close and reopen the panel.
When setting limits on the child’s computer, select its name followed by (this computer) at the top. If you manage from another computer, add the child’s computer using the steps below.
Connect from another computer
Both computers must be on and connected to the same home network. Network access must be enabled on the child’s computer, with the parent’s account selected in the installer.
- In the panel, choose Add computer….
- Enter only the computer name from the installer’s final screen, for example
KOMPUTER-DZIECI, and choose OK. Do not add the parent’s account name here. - If a Windows credentials dialog appears, enter the name and password of the parent’s account on the child’s computer that was selected for network management during installation, for example
Rodzic. The account name alone is enough — the panel adds the computer name. - Wait for the list of children to load. Check the computer name at the top of the panel.
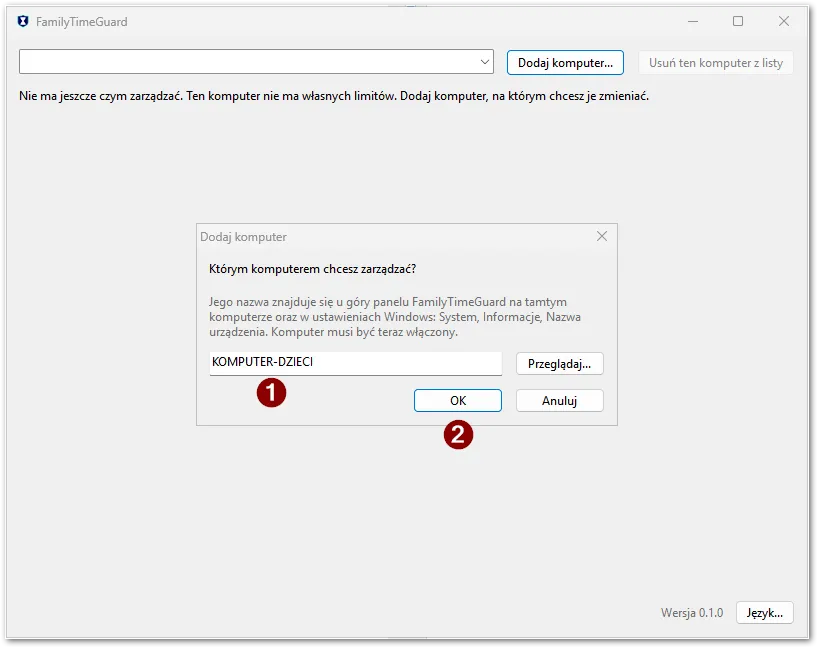
1 — the child’s computer name. 2 — confirm and start connecting.
Browse… helps you find a computer, but an empty list does not prove that it is unreachable. You can enter the name manually. Having an administrator account on that computer does not replace selecting it for network access in the installer.
The panel remembers the computer you add. Forget this computer removes only that list entry — limits on the child’s computer keep running.
Choose a child and check supervision
Select the account you want to configure from the list of children, for example Ala. Check both the computer name and the child. Each account has its own settings; the same child has a separate limit on another computer.
The account should say Supervised. If it says Not supervised, choose Start supervision for that account. Do not turn supervision off as a way to pause counting — the program then stops enforcing limits.
If the child is missing from the list, run the installer again on their computer and select the account for supervision. If the panel shows Supervision unknown or a read error, resolve that message first. Seeing fields with limits does not confirm that supervision is running.
Also check Time zone. The program uses this zone to determine days and allowed hours. If it says not set, open Windows date and time settings on the child’s computer and check the zone using Microsoft’s instructions. Correct it if needed, then run the installer again with the same accounts and computer roles selected. The installer will try to fill in the missing zone. Reopen the panel and check the result.
Changing the Windows time zone does not replace a zone already saved in FamilyTimeGuard. The panel currently has no editor for this setting. If the displayed zone is wrong or still missing, do not consider the schedule verified; keep the zone name or message to help resolve the problem.
Set the daily limit
On the Time limits tab, choose one of two approaches:
- The same every day: leave A separate limit for each weekday unchecked. In the every day row, enter a number and select minutes or hours.
- Different on different days: check A separate limit for each weekday and review all seven values. For example, 45 minutes from Monday to Friday and 2 hours on Saturday and Sunday.
This is an example of using the panel — choose values that fit your family’s rules.
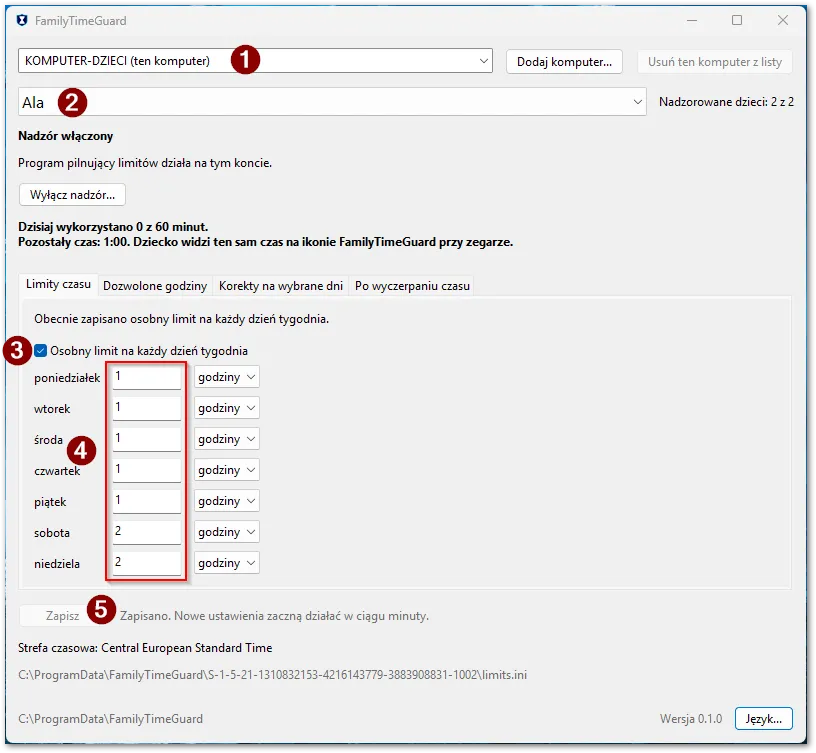
1 — computer. 2 — child. 3 — separate weekday limits. 4 — time for each day. 5 — save settings.
The limit covers total time using the account, not time in one game or browser. Closing a game does not stop counting. Locking the screen does not stop time either. Switching users and leaving the sign-in screen open still uses the child’s time until someone else takes their place. For a break, the child should save their work and sign out.
Unused minutes do not automatically carry over to the next day. 0 minutes means a day with no time available, but a positive correction for a particular date can grant time even on that day.
Set allowed hours
The Allowed hours tab answers a different question: when the child can use the computer. The daily limit determines how long. Both conditions apply at the same time.
For example, a 60-minute limit and allowed hours of 16:00–20:00 give the child one hour within that period. A child starting at 19:30 with their full allowance has only 30 minutes until the allowed period ends. At 20:00, the chosen action takes effect even if some of the daily allowance remains.
The grid has days in columns and hours in rows. Filled cells mean use is allowed; empty cells mean it is not.
- Set Grid: 60 minutes to work with whole hours. Steps of 30 and 15 minutes are also available.
- For the example period 16:00–20:00, leave the cells from 16:00 through 19:00 filled. The 19:00 cell covers the time up to 20:00.
- Click or drag across cells to change them. Starting on a filled cell makes the selected area disallowed; starting on an empty cell makes it allowed. If the whole day is initially allowed, clear the hours before 16:00 and from 20:00 separately.
- Set and check the remaining days. For example, you could leave 10:00–20:00 allowed on Saturday and Sunday.
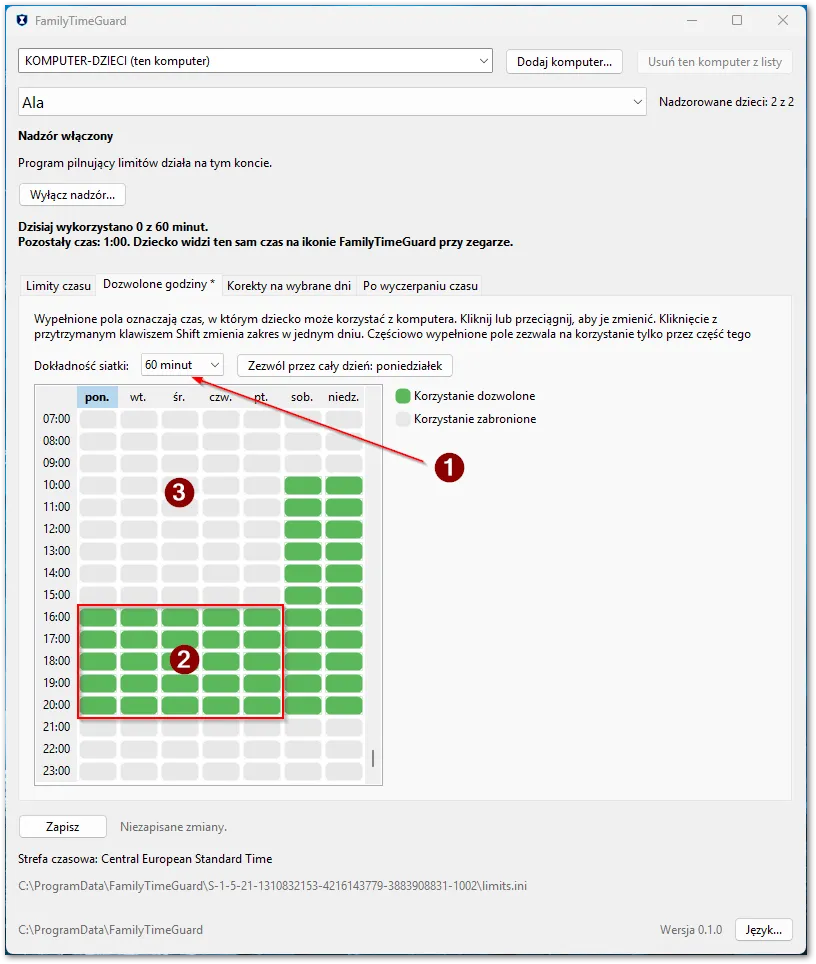
1 — grid granularity. 2 — filled cells where use is allowed. 3 — empty cells outside the allowed hours.
Shift-click changes a range within one day. Allow … all day restores the full day for the selected column; check the day named on the button before using it.
A partly filled cell allows only part of the time it represents. Choose a finer grid to check the boundaries more easily. Changing the grid granularity alone does not change the saved hours.
Do not try to block a whole day by clearing its column. The grid will not remove the last allowed period. To set a day with no use, choose 0 minutes on Time limits and check that no positive correction applies to that date.
Choose what happens at the end
Open At the limit. The selected action applies both when the daily allowance is used up and when the allowed hours end.
| Option | What happens |
|---|---|
| Sign the child out | Ends the child’s session and closes their programs. This is the default. |
| End the programs | Closes only programs on the prepared list. The child stays signed in and can use other programs. |
| Turn the computer off | Shuts down the whole computer, including any other users’ open sessions. |
Unsaved work may be lost. Shutting down also affects other signed-in users. For the first test, leave Sign the child out selected.
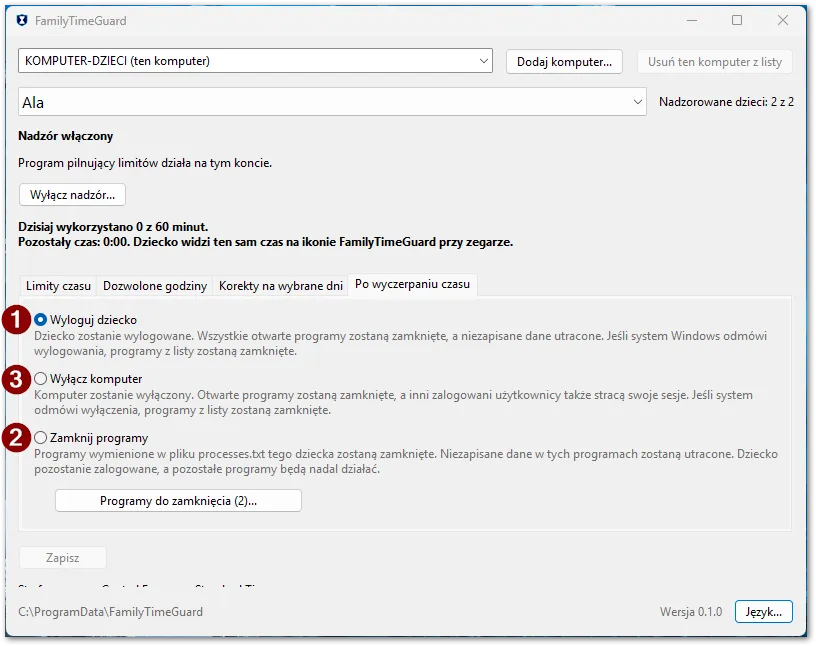
1 — sign the child out. 2 — close selected programs. 3 — shut down the whole computer. Choose one option.
If you choose End the programs, open Programs to close (…)… and check the list. Enter filenames with their extensions, for example chrome.exe, without paths or wildcards. You can find the name in Task Manager’s Details tab on the child’s computer. An empty list prevents you from saving this action.
In the programs list dialog, OK saves the list immediately. Save your choice of action separately with Save in the main window.
Save and repeat for the other children
Choose Save below the tabs. This saves changes from all four tabs for the selected child. Wait for Saved. The new settings will take effect within a minute.
An asterisk by a tab name means unsaved changes. An exclamation mark indicates an invalid value — correct it using the panel’s message. If saving fails, do not assume that the new rules already apply.
Select the next child, for example Ola, and set their rules. After saving, select each account again and check its limits, hours and final action. The panel does not copy settings between children.
You can then close the panel. Supervision runs on the child’s computer without the parent’s panel being open.
Make an exception for one day
You can leave Dated corrections empty during first setup. It is for one-off changes, such as an extra 30 minutes next Saturday.
- Open the tab and choose Add….
- Select the date. Under Minutes to add or remove, enter
30to add half an hour or-15to remove a quarter of an hour. - Confirm with OK, then choose Save in the main panel.
A correction changes that day’s total allowance. It does not reset time already used or extend allowed hours. If a correction already exists for the date, the panel asks whether to replace it. For example, replacing 30 with 15 means a quarter of an hour extra instead of half an hour, not another 15 minutes.
Test the child’s account
Run a short test for each child. Plan it within allowed hours, with at least five minutes before the period ends. Tell the child that the test will sign them out, and have them save and close their work first.
- In the parent’s panel, write down the intended limit for today. Check that there is no correction for today’s date — it would change the test result. If there is one, test on a day without a correction.
- With the child signed out, read Today: … of … minutes used. Set today’s limit 3 minutes higher than the amount used. For example, with 20 minutes used, set 23 minutes; with no usage today, set 3 minutes. Keep the existing limit mode: change today’s row or the every day value.
- Select Sign the child out, save and wait a minute before signing in to the child’s account.
- In the child’s account, find the FamilyTimeGuard icon by the clock; it may be among the hidden icons. Hover over it and check the time left. It should be about 2–3 minutes, because the usage shown in the panel is in whole minutes.
- Stay in the child’s account and check that the time decreases. With sound on, check the one-minute warning. When the countdown finishes, the Windows sign-in screen should appear.
- Sign in to the parent’s account. Restore the intended limit, save and wait a minute. If your intended action is different from signing out, restore that too. The minutes used in the test remain part of today’s usage.
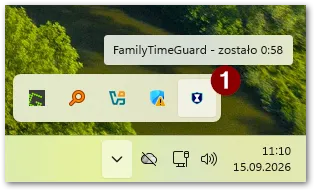
1 — the icon the child hovers over to check the time left.
Time left may be shorter than the unused daily allowance if the allowed hours end sooner. The parent’s panel reads the same remaining time. Missing sound alone does not mean the limit is not working — also check the countdown and sign-out. The child chooses the language and voice by right-clicking the icon and using Language and Voice.
Tell the child how to take a break: save their work and sign out. A session left on the lock screen or sign-in screen can end when time runs out while the child is away and cannot hear the warning.
If the test did not go as described, note the selected account, configured limit and full panel message. Also check that you restored the intended settings. Continue with Troubleshooting.