Start by installing on the computer where you want to limit the children’s time. One installer can enable supervision, install the parent’s panel and allow management over your home network.
If you want to change limits from another computer, you will install just the parent’s panel there. The panel is a Windows application.
The screenshots currently show the Polish interface. The instructions use the English labels.
Before you run the installer
Follow Prepare the computer. The children’s Windows accounts must already exist — the installer does not create them. Each child should have a separate standard account, and every enabled administrator account must have a password the children do not know.
Ask the children to save their work and sign out. Sign in to the parent’s administrator account and have the FamilyTimeGuard installer ready.
Supervision starts as soon as installation finishes. A newly added account gets 120 minutes a day by default, with no restriction on the hours when the computer may be used. When time runs out, the child is signed out. You can set your own rules in the panel after installation.
Run the installer
Open the FamilyTimeGuard installer. Approve the Windows request for administrator permissions. If a language selection appears, choose English.
Wait while the installer reads the accounts and checks which ones have no password. It may display a message about reading accounts for a few seconds. You will then reach What this computer is for.
Choose this computer’s roles
The What this computer is for page has three checkboxes. You can select more than one:
- Supervise children on this computer — time limits will apply here.
- Install the parent’s panel on this computer — you will open the panel and change limits here.
- Let this computer be managed from another one on this network — limits on this computer can also be changed over your home network.
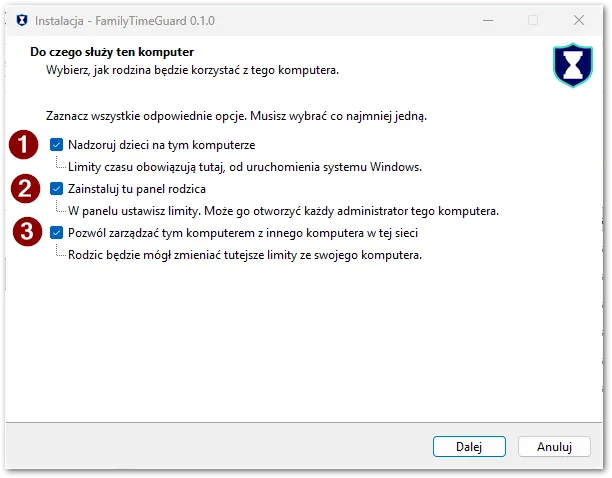
Options 1 and 2 are enough when children use this computer and the parent sets limits on it. The numbers identify the three options above.
Choose the options that match how you plan to use the program:
| What this computer is for | Supervision (1) | Panel (2) | Access from another computer (3) |
|---|---|---|---|
| Children use it; the parent sets limits here | Yes | Yes | No |
| Children use it; the parent sets limits only from another computer | Yes | No | Yes |
| Children use it; the parent sets limits here and from another computer | Yes | Yes | Yes |
| The parent only manages another computer | No | Yes | No |
Select option 3 on the child’s computer, which the parent will connect to. The parent’s other computer only needs option 2.
Do not select supervision alone: the installer also requires a panel here or access from another computer, so the parent has somewhere to change limits. Continue to the next page.
Select the children’s accounts
The Supervised accounts page appears only if you selected supervision on this computer.
Select every child account whose time you want to limit. Each gets a separate allowance. Leave the parent’s account unselected. The installer will not let you supervise an administrator account.
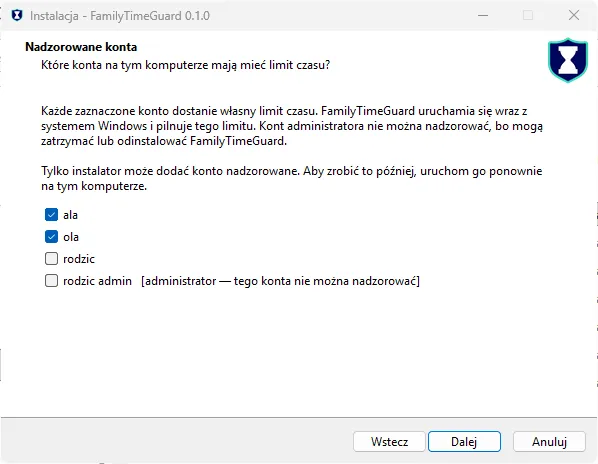
Ala and Ola are example accounts for two children. Selecting both creates two separate time limits.
If a child’s account is missing, check in Windows that it exists and is enabled. If it has administrator rights, change it to a standard account as described in Prepare the computer. Then run the installer again so it reads the current list of accounts.
Once your selection is ready, continue. To add another account to supervision later, run the installer again on the child’s computer.
Select the parents who can manage over the network
The Managing this computer from elsewhere page appears only if you selected option 3. Otherwise, continue to the next section of this guide.
Select a parent’s account that exists on this child’s computer. The parent will use its credentials when the panel on the other computer asks them to sign in. A local standard account with a password is enough.
The selected account gets access to every child’s settings on this computer and can turn off their limits. Select only accounts belonging to trusted adults. Supervised accounts and accounts without passwords cannot be selected.
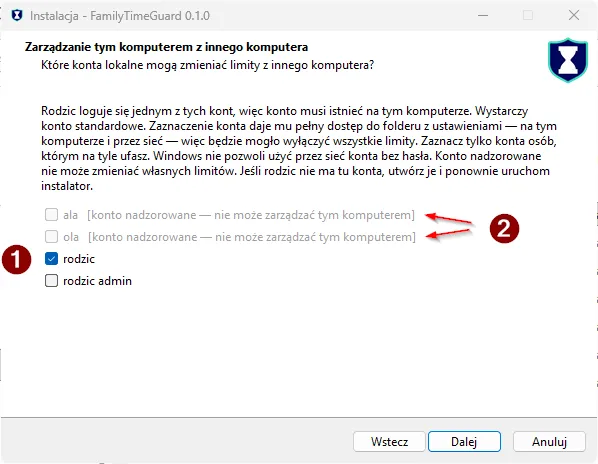
1 — the account whose credentials the parent will use to connect. 2 — the children’s accounts, which cannot manage their own limits.
If the parent has no account here, cancel installation, create a local account for them with a password and run the installer again. If you decide against network management, go back to the computer roles and clear option 3. If supervision is enabled, keep the parent’s panel selected instead.
Finish installation
Read the licence agreement. If you agree to its terms, accept it and continue. Start installation from the ready page, then wait for it to finish.
You do not need to choose a program folder. The installer places the program in Program Files and sets up supervision for the selected accounts.
If network management is enabled, the last screen shows this computer’s name. Write it down — you will need it when adding the computer to the parent’s panel.
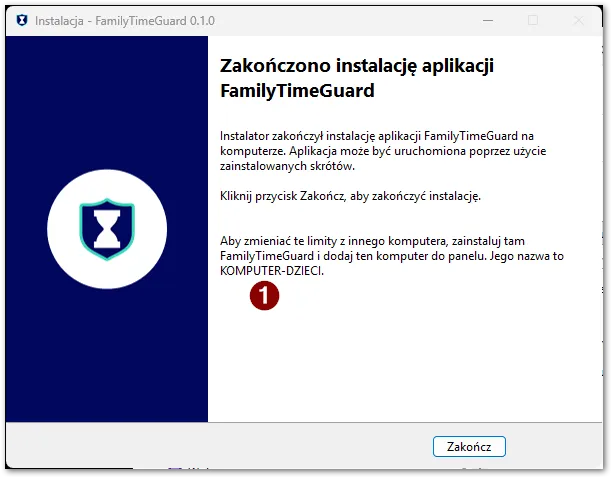
1 — the name to add in the panel on the other computer. This information appears when network access is enabled.
Close the installer. If you selected the panel here, open FamilyTimeGuard Parent Panel from the Start menu and approve the administrator permissions request. Check that you can see the children selected during installation.
To manage from another computer, run the same installer there and select only Install the parent’s panel on this computer. The installer skips both account selection pages. After installation, open the panel, add the child’s computer using the name you wrote down and use the credentials of the account selected for network access. Both computers must be on and connected to the same home network.
Continue to First setup to set your own limits and allowed hours, then check that they work in the child’s account.
If the installer reports a problem
Read the whole message, especially the account names. Finishing the file copy does not mean that every selected account is supervised.
| What the installer reports | What to do |
|---|---|
| Administrator accounts without passwords | Set passwords for every listed account and run the installer again. On the child’s computer, do not work around this by selecting just the panel — that will not enable supervision. |
| A selected child account has no password | Return to account preparation and set a password. The limit can work without one, but siblings could use the same account. |
| Some accounts could not be configured | The accounts named in the error have no limit. The other selected accounts are already supervised. Fix the cause in the message and run the installer again. |
| No time limits are running on the computer | Run the installer again and let it finish. Until then, do not assume that time is being limited. |
| The time zone could not be set | Check the time zone in Windows date and time settings on the child’s computer. Correct it if needed, then run the installer again with the same accounts and computer roles selected. Check in the panel whether the missing zone has been filled in. See First setup. |
| Settings were replaced with defaults | Open the panel and set your own limit and allowed hours for the named accounts. |
| The panel could not be hidden from children | Limits are running, but children may see the panel shortcut. The shortcut itself does not give them the administrator permissions needed to change limits locally. |
If the installer reports another error, keep its full text before closing the window. Use Troubleshooting to check the cause and next steps.