Start on the computer your child will use. Each child needs their own standard Windows account, and the parent needs access to a separate administrator account. Keep administrator passwords out of the children’s reach.
FamilyTimeGuard limits time on the Windows accounts you select. If a child can sign in to a parent’s or sibling’s account, they can use that account’s permissions or time.
Check the system
The installer requires Windows 10 or later, in a 64-bit version. The program will not run on 32-bit Windows.
Open Settings → System → About. Check the Windows version and the System type field. If you are unsure, see Microsoft’s guide to 32-bit and 64-bit Windows.
Separate parent and child accounts
Set up the accounts like this:
| Account | Windows account type | Who has access |
|---|---|---|
| Account for managing the computer | Administrator | Parent |
| First child’s account | Standard user | That child and the parent |
| Next child’s account | Standard user | That child and the parent |
You do not need new accounts if you already have this arrangement. Children sharing one account share one time limit — the program cannot tell who is sitting at the screen.
If you and your child currently share an account, separate your accounts first. If the existing account is to become the child’s, create a separate administrator account for yourself and check that you can sign in to it. Only then remove administrator rights from the child’s account.
Create a child account if needed
You do not need an email address for your child to create a local Windows account. Follow these steps from an administrator account:
- Open Settings → Accounts and go to the list of other users.
- Choose to add an account, then select I don’t have this person’s sign-in information.
- Select Add a user without a Microsoft account.
- Enter a name that lets you recognise the child and set a password. Complete the setup.
Screen names can differ between Windows versions. Microsoft describes the procedure in its guide to managing user accounts.
Sign in to the new account and check that your child can access the files and programs they need. Do not delete the old account to make room for the new one — first make sure you have kept the data you need.
Check the child’s permissions
Sign in to an administrator account. In Windows 11, follow the four numbered steps in the illustration:
- Open Settings.
- Go to Accounts → Other Users.
- Expand the child’s account and select Change account type.
- Under Account type, select Standard user and confirm with OK.
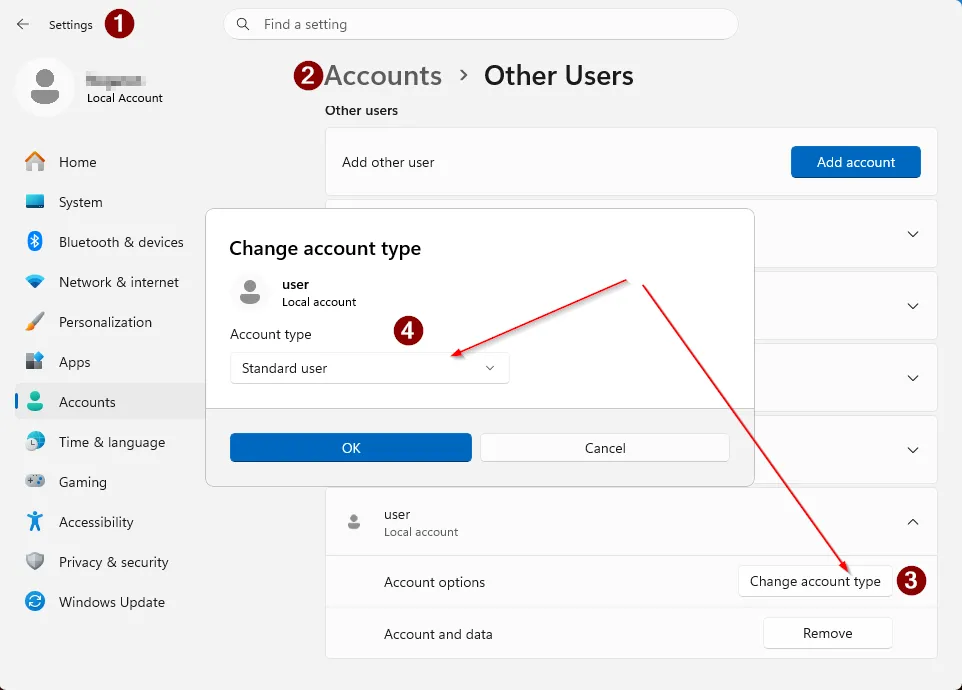
Numbers 1–4 match the steps above. The example child account in the illustration is named “user”.
Repeat these steps for each child. In Windows 10, the page listing other users may have a different name.
A child with administrator rights can remove the program or change its settings outside the panel. This is why the installer does not let you select an administrator account for supervision.
If your child needs administrator rights to install a program, approve that particular action yourself. Do not change their account type for it or give them your password.
Set passwords and check other ways to sign in
Every enabled administrator account on the child’s computer must have a password. This includes other adults’ accounts and the built-in Administrator account if it has been enabled. A single administrator account without a password lets a child bypass the limit. The installer refuses to enable supervision in that situation.
Set a separate password for each child too. A password known to a sibling gives them access to that child’s time allowance. Check the other accounts on the computer as well — supervising one account does not limit the others.
To change a local account’s password, sign in to it and open Settings → Accounts → Sign-in options → Password. See Microsoft’s guide to local account passwords for details.
If you sign in with a PIN, keep that private too. A Windows Hello PIN is different from a Microsoft account password. Seeing a PIN field alone does not confirm that the account has a password.
Sign out and check the sign-in screen: your child should not be able to enter an administrator account without credentials they do not know. If the computer automatically signs in to your account when it starts, turn off automatic sign-in before installing.
Do not leave your session open for your child. Sign out when you finish using a shared computer.
Remember physical access to the computer
Accounts and passwords do not close every route around the limits. Starting another operating system from a USB drive is outside FamilyTimeGuard’s control. Protecting against that access also requires securing the drive and the computer’s boot settings.
The Protection guide covers this topic.
Before enabling or changing encryption, or changing UEFI settings, follow instructions for your computer model or get help from a specialist. Back up your data first. If the drive is already encrypted or you are about to encrypt it, keep the recovery key outside this computer.
Confirm readiness
Before starting the installer, check that:
- The computer runs a 64-bit version of Windows 10 or later.
- You can sign in to a separate administrator account belonging to the parent.
- Each child has their own Standard user account.
- Every enabled administrator account has a password the children do not know.
- Children cannot access a parent’s or sibling’s account through a known PIN, password or automatic sign-in.
- The files and programs your children need open in their accounts.
If this computer will only manage limits on another computer, do not create child accounts here. Prepare the accounts on the computer where time will be limited.